Indefinite Hiatus

If you want to know more, I’m going to be attempting to keep a blog about my pregnancy experience here.

My Instragram statement: “I thank each and every one of you who have followed and supported the Picky Gourmet over the years. Unfortunately, I will be going on an indefinite hiatus. I am pregnant, due in November, and to keep it incredibly brief, there are health complications arising with our baby boy that in the best case scenarios will be leading to an extended NICU stay. What it comes down to is I am not able to focus on this project the way I could in the past. It hurts my heart but this is the right decision for me, my family and my mental health right now. I hope this is a “see you later”, but for now, sadly, I have to say goodbye to my fellow foodies.”

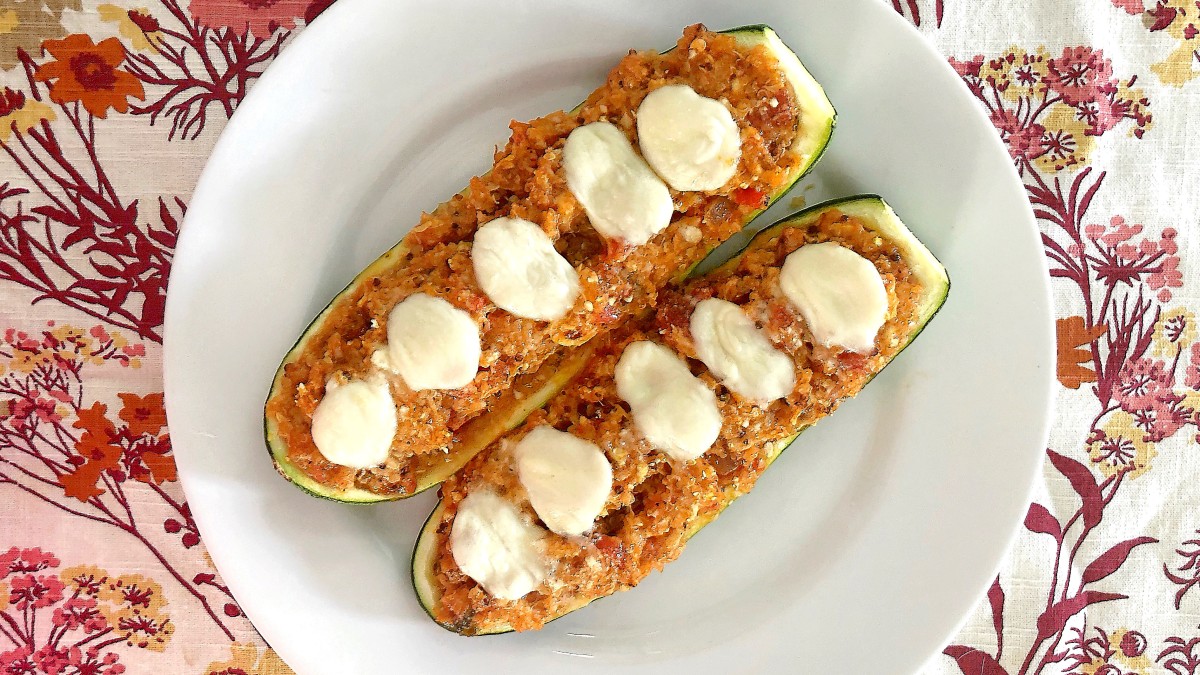
Quinoa Stuffed Zucchini

  • 2 large or 3 medium zucchini
  • 1 cup quinoa, precooked & cooled
  • 1 cup tomato sauce
  • 1/2 cup grated parmesan
  • 2 Tbsp extra virgin olive oil
  • 1 Tbsp minced garlic
  • 1/2 tsp crushed red pepper
  • 10-12 pieces of pearl mozzarella (the kind that come in a small tub)
  • salt & pepper to taste
  1. Preheat the oven to 350 degrees.
  2. Slice the zucchini in half lengthwise. Cut off the thick stems at the top. Using a small metal spoon, carefully scrap out the inside of the zucchini to create “boats”. (Leave a little inside for structure so that they don’t fall apart.)
  3. Using paper towels, squeeze excess moisture from the zucchini pulp over the sink. Measure out 1 cup of shredded zucchini into a large bowl.
  4. Add the precooked & cooled quinoa of your choice to the zucchini pulp. Add the tomato sauce, parmesan, extra virgin olive oil, garlic & crushed red pepper. Stir until everything is combined. Add salt & pepper to taste.
  5. Spoon the sauce/quinoa mixture into the zucchini boats & place them on a lined sheet pan. Cut the mozzarella balls in half & place them evenly on top of the stuffed zucchini.
  6. Cook for 20-25 minutes, depending on the size of the zucchini, until the filling is bubbling & the mozzarella is melted. Let them cool slightly, about 5 minutes, before serving.

Suggestions & Substitutions: I used a simple instant red and black quinoa package that you make in the microwave, because if there’s one thing I always seem to mess up, it’s cooking grains on the stovetop. (I still never feel like I get rice quite right.) It is totally your call on how you want to make it. This is a great recipe if you happen to have leftover quinoa laying around from another meal.

Does the color matter? Not really. White/tan quinoa tends to be the most delicate and as it gets darker (red and black) they have more flavor, texture and fiber. The flavor will be dominated by the sauce here, so I went with the mixture of red and black because I wanted that added texture and fiber in the recipe.

This is a vegetarian meal, as I mentioned, but if you want to switch out the parmesan for some breadcrumbs or nutritional yeast and omit the mozzarella, you have a vegan meal!


Everyday Tomato Sauce

I’ve been meaning to do this one for a while, because tomato sauce is something that we use a lot. I’m actually going to be posting another recipe tomorrow, but while I was working on it, I decided I needed to do this first. This is my standard tomato sauce that I use all the time, so this post will be a great reference tool. I’ll be linking back to this in the future, whenever a recipe calls for it.

I make sauce like this at least every couple weeks. I prefer it to jarred sauce, and hey, at the moment, it might get you out of a pinch. I don’t know about your local grocery, but our pasta and sauce aisle has been really picked over lately. There always seemed to be canned tomatoes though!

It’s worth noting this makes about 2 standard mason jars worth of sauce… sometimes a little extra. If you don’t have any, save and reuse jars from the store! (Just make sure you clean them out really well.)

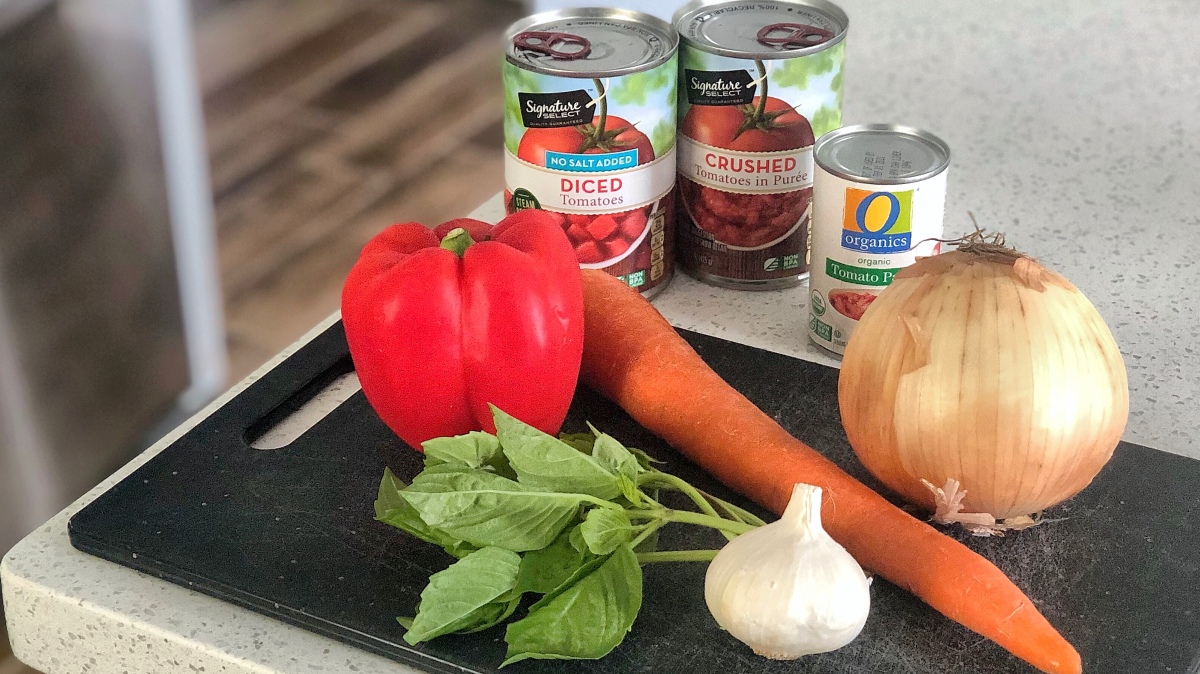
Everyday Tomato Sauce

  • 2 Tbsp olive oil
  • small yellow onion, diced
  • 2 Tbsp minced garlic
  • 1 large carrot, grated
  • 1 red bell pepper, finely diced
  • 6oz tomato paste
  • 14.5oz crushed tomatoes
  • 14.5oz diced tomatoes
  • 2 tsp dried oregano
  • 2 tsp dried basil
  • 1/2 cup fresh basil, chopped
  • salt & pepper to taste
  1. Put the olive oil in a sauce pot over medium heat. Add the diced onion & let it sweat for about 2-3 minutes, until it begins to become translucent. Add the garlic, grated carrot & diced bell pepper. Stir to combine & let it cook for about 5 minutes, until the veggies are tender.
  2. Add the tomato paste to the veggies. Using a rubber or wooden spatula, stir it in & scrap up any bits that have stuck to the bottom of the pan. Once it’s all well-incorporated, add the crushed & diced tomato. Stir it all together & reduce the heat to low.
  3. Stir in the dried oregano, & the dried & fresh basil. Add salt & pepper to taste. Cover & allow the sauce to simmer for at least 2-3 hours, stirring occasionally. Serve immediately or let cool, jar & refrigerate.

Suggestions & Substitutions: I like to use a mix of crushed and diced tomatoes because I like the added texture. If you want a smoother sauce, go with two cans of crushed instead.

You can also use fresh tomatoes as well! For a while my garden was producing roma tomatoes like crazy and I would dice and blend my own. Or sometimes, if I have a couple tomatoes I have to use up soon, I’ll add them in with canned to freshen it up. The pros of canned tomatoes is that they stay in your pantry for a very long time, which is very helpful, especially at the moment when avoiding the store is a big priority.

If you have options, try to find canned tomatoes that don’t add salt. Lots of brand name sauces have a lot of salt and sugar in them, and one of the things I like about making my own is that I can control that. Carrots add a nice natural sweetness to it, but you can always add a pinch of sugar to yours if you prefer it.

This is also a fantastic way to use up things you have laying around. Have fun with this as your base! Add ground meat, mushrooms, chopped spinach or spicier peppers if you like. I love adding in roasted garlic (when I feel like taking that extra step), crushed red pepper flakes & sometimes a little grated parmesan cheese. It’s a great canvas to work with.

And just think of all the ways to use it…

…On homemade ricotta gnocchi

…Used for baked eggs aka shakshuka

…In quick & easy pizza roll ups

…Used two ways in chicken parmesan

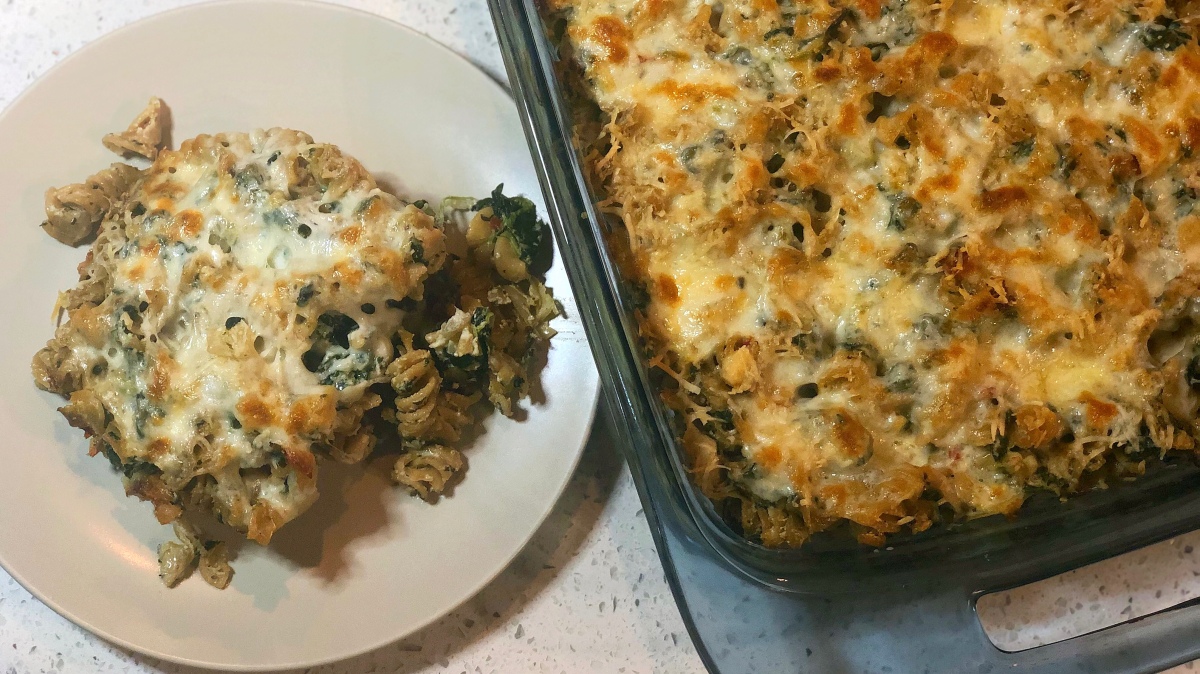
Spinach & Artichoke Pasta Bake

It’s been a while. Before I start, I want to point out that there’s the slightly new & more streamlined format for The Picky Gourmet posts. It’s gonna go like: short introduction to quell the general online jokes about bloggers talking too much when people just want the food (ha), the coveted recipe itself, followed by any suggestions or possible substitutions, & finally all the process photos are at the end for the visual learners.

OK, the elephant in the room here is that my big return to blog recipes happens to be right when grocery stores are the last place most people want to be. I hope everyone out there is staying safe, washing hands & keeping calm during this time while we are all trying to deal with this virus.

The good news is, this recipe happens to use a lot of ingredients you might already have on hand. Well, as long as you didn’t blow your whole grocery budget on toilet paper. Surprisingly, for a dish that is full of fresh, herbaceous flavor, the only things you actually need from produce are an onion & garlic (which I feel like most people have laying around anyway). Everything else is a pantry pull!

So let’s fire up the oven, hunker down with a glass of wine & make a…

Spinach & Artichoke Pasta Bake

  • 1 head of garlic
  • 1/2 yellow or white onion, diced
  • 16 oz whole grain rotini pasta
  • 15 oz ricotta cheese
  • 8 oz frozen spinach, thawed & drained of excess moisture
  • 6 oz jarred artichoke hearts, chopped
  • 1/2 cup sun-dried tomatoes, chopped
  • 1/2 cup grated parmesan cheese
  • 1/2 cup grated pecorino cheese
  • 1 Tbsp dried basil
  • 1 Tbsp dried oregano
  • 1/2 tsp crushed red pepper
  • 1 1/2 cup shredded mozzarella
  1. Preheat your oven to 400 degrees. Peel off the “paper” of the garlic, chop off the top & place it on a piece of tin foil. Drizzle the garlic with olive oil & close the foil around it. Roast for 45-50 minutes. Let it cool & squeeze the roasted garlic into a small bowl & mash with a fork. (Here is a quick little video from The Kitchn if you have never done this before & are unsure).
  2. Meanwhile, on the stovetop, cook the diced onion in a Tbsp of olive oil over medium heat, about 5-7 minutes until they become translucent & develop a golden brown color. Set aside to cool.
  3. At the same time, you can also cook your pasta on the stovetop as well. Cook about 1 minute less than package instructions. Once it’s done, drain the water & season the pasta with a touch of olive oil, half of the dried basil & oregano (1/2 Tbsp of each) & a pinch of salt & pepper.
  4. Bring the oven down to 350 degrees. In a large bowl, mix together the ricotta cheese, cooked onions & spinach. Add in the roasted garlic, chopped artichoke hearts, chopped sun-dried tomatoes, half of the parmesan & pecorino cheeses (1/4 cup each), with the crushed red pepper, the rest of the dried basil & oregano, & a pinch of salt & pepper.
  5. Gently fold the pasta into the ricotta cheese mixture until well incorporated. Transfer to a 9×13 baking dish & top with the mozzarella cheese & the remaining parmesan & pecorino.
  6. Bake at 350 degrees for about 15-20 minutes, until the cheese is golden brown & bubbly. A minute under the broiler can help develop color at the end, but keep an eye on it.

Suggestions & Substitutions: obviously any pasta can be used here, as long as it isn’t a long noodle like spaghetti. Ziti, penne, cavatappi, anything like that would be great. I like using the whole grain here, because there’s so much flavor & cheese, why not sneak in a little extra fiber in there? Since this is a vegetarian recipe, protein infused pasta would be another great choice.

The key with these specific pantry ingredients is taking away the excess moisture. Obviously, frozen spinach needs to be thawed & have all that water squeezed out of it. I used the sun-dried tomatoes that come in a packet, but if you already have the jarred/oil-packed kind, just dab them with a paper towel. The tomatoes & artichoke hearts (which I always buy in a jar) don’t have to be bone dry, but just enough to avoid too much oil in the mixture.

While this makes a great meatless Monday or vegetarian dinner, if you want some added protein, throw some cubed rotisserie chicken in there or even some crumbled sausage. And if you want to cut back on the cheese, you could skip the top layer of mozzarella. (I mean, I wouldn’t, but no judgement.)

And a final note on the cheese. I personally love the funky, strong flavor that pecorino adds to the dish. If you don’t have pecorino cheese or don’t feel like spending the extra money, you can use all parmesan. I just beg you to grate it yourself instead of using the green tube can.

And that’s that! Stay healthy, stay safe & keep cooking.


Autumnal Mulled Cider

Over the past 3 to 4 years I have lived in southern California and now Hawaii, but I am a born and raised Massachusetts girl at heart. I didn’t realize how much I would truly miss the autumn weather, the changing leaves, and all my boots, scarves, and cozy sweaters.

My social media has been filled with pictures of my friends & family enjoying all those fall delights. I know, I know, I get to live in paradise, and the tables will turn when they are shoveling snow and I’m on the beach, but it’s still hard sometimes. (Honestly, I even miss winter too.)

The one way I can get those autumn vibes flowing through me is with seasonal food and drinks. Well, that and my artificial fall leaf wreath and Halloween yard decor from Target. So today I’m sharing my quickest, easiest fix for when I’m missing New England and the crisp October breeze: mulled cider… in the slow cooker!

  • 2 quarts organic apple cider
  • 2 Tbsp maple syrup (the real stuff, if you can splurge)
  • 1 orange, sliced
  • 1 Tbsp whole cloves
  • 1 Tbsp whole allspice
  • 3 cinnamon sticks
  • rum or whisky (optional)
  1. Put the cider into a slow cooker & stir in the maple syrup. Add the sliced orange.
  2. Using cheese cloth or a coffee filter (my go-to), create a bundle of the cloves, allspice & cinnamon sticks. You can break the sticks in half to make them fit better. Tie the bundle tightly with twine for easy removal. If using a coffee filter, I like to use a toothpick to poke some holes so that the flavor infuses quicker. Place the spice bundle in the cider.
  3. “Cook” on low for at least an hour before serving. Leave it all day on low heat or the warm setting. Serve punchbowl style & add a shot rum or whisky to your glass at your discretion (& my suggestion).


A look at my coffee filter spice bundle for reference

The slow cooker is key for me because it makes it easy to serve and it also doesn’t heat up the house like keeping it on the stovetop all day would. (Very important when October still means 85 degrees and humid.)

I make this constantly in the fall. It’s lovely for long Sundays watching football or waiting for trick-or-treaters. It’s been a staple at my Thanksgivings and Christmases for the past few years. Nothing tastes more like New England in autumn to me than mulled cider.

It’s a wonderful option for family and holiday gatherings because it gives people the option of what kind of liquor to add, if any. Kids can still partake and any non-drinkers at your party will feel like they get to enjoy something special besides sparkling water or soda. If you get one of the big gallon jugs of cider or more, you can keep replenishing the pot if it’s a big group of people.

What’s the first thing you run to make when fall rolls around?

Gourmet Grilled Cheese with Pear & Brie

Long time, no see.

I was dealt some big blows over the last couple months in terms of health and personal life, and despite all my intentions to keep up with the blog, it wasn’t in the cards. I am not going to get into detail about all that at the moment, perhaps in the future, but for now, let’s focus on some food. For the record, I am OK now, feeling good and ready to move forward.

I have a few recipes already developed, tested, & photographed, so expect a lot more action in the next few weeks! (And yes, I mean it this time.)

When people ask me what kind of food I cook and write about, I always say it’s comfort food with a twist. I like taking familiar, beloved dishes and giving you another way to look at it. I think the spins on classics make things fun and interesting, but also are a way of introducing yourself to new idea (especially for people who grew up picky like me).

So what’s one of the classic-iest classic comfort foods ever? Grilled cheese. This is my take on a gourmet version, mixing the elegance of a fancy cheese board with the nostalgia of everyone’s favorite childhood sandwiches.

Note: Since a sandwich can vary in size, these are estimated amounts based on a shopping list that will make at least 4 sandwiches with some ingredients left over.

  • 2 Tbsp olive oil
  • medium white onion
  • 2 Tbsp balsamic vinegar
  • loaf of sourdough bread (8 slices)
  • small jar of mayonnaise
  • 7-8oz brie cheese, sliced
  • baby arugula (1 cup, packed)
  • fresh basil (2/3 cup, loosely packed)
  • 1 bartlett pear, thinly sliced
  • 4oz blue cheese crumbles
  1. Start by caramelizing the onion. Thinly slice the onion. Heat 2 Tbsp of olive oil in a pan over medium heat. Sprinkle with a pinch of salt & cook the onion for 5 minutes, then reduce the heat to low. Cook for 30-45 minutes, stirring occasionally, until brown and tender. Deglaze with the balsamic vinegar & scrap any bits from the bottom of the pan. Set aside to cool. Onions can be made ahead and refrigerated for up to 4 days.
  2. To make the sandwich, start by heating a skillet, griddle pan or panini press to medium heat. Spread mayonnaise evenly on what will be the exterior sides of the bread slices. (You can used softened butter if you are anti-mayo, but trust me, it cooks much more evenly.)
  3. Build the sandwiches. On the bottom piece of bread, start with a layer of sliced brie, waxy shell removed for better melting. Mix the arugula and basil, adding that next. Follow with a layer of pear slices, the caramelized onions, and finally the blue cheese crumbles. Top with the second slice of bread. Repeat for additional sandwiches.
  4. Toast the sandwiches for 4-5 minutes, flipping halfway through (unless you are using a panini press). The brie should be melted & the bread crispy but not burnt.

  5. A couple cross sections so you can see how I arranged the ingredientsIf you are new around these parts, I always like to offer up suggestions on how to modify my recipes for your tastes. I know a lot of bloggers and chefs hate when people make changes to their dishes, but my motto is “I cook what I like”, and you should too.

    Bread… use whatever you like. Italian, wheat, whatever. I happen to love and suggest sourdough because of the way it offsets the sweet flavors of the brie and pears. Speaking of, I am obsessed with pears. They are one of my favorite fruits, but I know it’s apple picking season in a lot of areas. (Jealous! But makes me wonder if there’s anywhere to go pineapple picking here in Hawaii…) You could definitely swap the two if you are looking for a new way to use up your surplus of apples and you are over pies and strudels.


    Bartlett pears are sweet & soft when ripe, perfect for this application

    If you want this sandwich right away with less hassle, an onion or bacon jam could be used in place of the caramelized onions to add that smoky, savory bite. And yes, bacon or prosciutto in general would really add to the gourmet cheese board theme going on here, but I don’t eat pigs and cows, so I’ll leave that up to you.

    This recipe is great for lunchtime when you are feeling a little fancy. You don’t have to make a bunch of sandwiches all at once, it’s totally easy to use them over the course of a week. If you are having a get-together, you could make 4, 5, or even 6 of these and cut them small to serve as an appetizer. It’s a great, hearty vegetarian option.

    What do you think? Is a grilled cheese a good way to experiment in the kitchen, or do you prefer the classic white bread and american combo? Let me know what you think, and I’ll see you soon with another new recipe!


On The Side: Marinated Cucumber Salad

It’s summertime, and unless you live in the Arctic or have spent the last 6 weeks under your covers with the A/C blasting, you know it’s getting super hot. Something that’s always left me perplexed is that the go-to summer side dish is potato salad. Hey, if you love it, that’s fine, but the idea of all that mayonnaise sitting under the blazing sun at a cook out… I’m all set, thanks.

I often see these containers of marinated cucumbers in the prepared food section of the grocery store. While picking one of those up would be an easy shortcut, sometimes the store can really drive the price up. So stroll on past, head to produce, and get your own.

Everything in this recipe I had on hand in my pantry or fridge. All I need to do was grab some Persian cucumbers, and I was able to make double the portion offered in the deli section, at a fraction of the cost.

Hey…. what the heck is a Persian cucumber exactly?

They are small, only about 6 inches long (hold your jokes) with virtually no seeds. They have a much more concentrated, sweet flavor, that hold up very well to all the other flavors we are going to add in. They usually come in a pack or bag of 5. You can use any cuke you like, but I highly recommend the Persian ones.

  • 2 cups sliced Persian cucumbers (approx. 5 cucumbers)
  • 1 sliced shallot
  • 1/4 cup orange juice
  • 2 Tbsp rice vinegar
  • 1 Tbsp low sodium soy sauce
  • 1/4 tsp fish sauce
  • 1 tsp sugar
  • 1/2 tsp garlic powder
  • 1/2 tsp dried dill
  • 1/4 tsp crushed red pepper
  • 1/4 tsp ground ginger
  • 2 Tbsp extra virgin olive oil
  1. Using a sharp knife or a mandolin, slice the cucumbers very thinly. Peel & thinly slice the shallot as well.
  2. In a bowl, combine the orange juice, rice vinegar, soy sauce, fish sauce & sugar. Stir until the sugar dissolves. Add the garlic, dill, crushed red pepper & ginger. Whisk together while slowly drizzling in the olive oil. Add the sliced cucumber & shallot, tossing to coat.
  3. Cover tightly & refrigerate for at least 2 hours to overnight. Serve chilled.

If you don’t have fish sauce, you could substitute sesame oil. Fish sauce is one of those ingredients that smells crazy, but a little goes a long way in adding depth of flavor. It’s that funky little note you can’t quite put your finger on.

Instinctually, I would have reached for some fresh lime juice as my citrus component, but funny little story: My husband loves a good old fashioned which requires a sliver of orange rind in it. I will get an orange, peel it, and make as many pieces as I can and freeze them so that they are always available for a quick cocktail. I happened to be doing this the other day, so I decided to juice the orange and use it for this recipe. I always prefer fresh citrus juice in recipes, but I won’t be mad if you want to take advantage of OJ you already have in the fridge. Just avoid pulp.

The first thing you taste in this dish is a great balance of sweet and sour, with a little kick of spice at the end from the crushed red pepper (which you can leave out to make it a little more family friendly). It’s the perfect companion for cook out staples like saucy ribs or spicy wings. They are great on the side of a burger or grilled chicken sandwich, but even better as a topping.


Or you can be like me, and spend all day picking at them out of the fridge as a snack because they can get a little addicting.

Can we talk about how easy it was too? The bulk of the work is just slicing the cucumbers. If you want paper thin slices, use a mandolin (carefully) but I like using my knife and keeping the slices a tiny bit thicker so that they still have a nice crunch to them.

The best part is making it the day ahead so you don’t have to worry about it. If you bring it out to a cook out, I’d suggest keeping the serving vessel on ice so that they keep that chilled factor that is oh-so refreshing on a scorching summer afternoon.

Stay cool, everyone! I’ll be back again soon with some more fun summer ideas.

One Pan Chicken Thighs with Lemon & Herb Vegetables & Potatoes

Well…. it’s been a while. My instincts are to write a long explanation of what got me sidetracked and how I took some time to think about what I want to do next here. The conclusion I came to was to focus on my cooking and sharing more recipes. Less filler, more flavor, so I figure maybe the best thing to do is get right to the food.

I’m purposefully finishing this post up with no time to spare. I am leaving in a couple hours to catch a flight to Seattle for a week of adventures, food & a good friend’s wedding. It’s fitting, since this dish is one that takes some time to prep, but is easy to clean up and walk away from. (You know, like the thoughts in my head lately about the blog.)

I specifically came up with this recipe when I got a new 5qt pan by Chrissy Teigen for Target and wanted to challenge myself to make dinner using it only. This is my one pan plan for a perfect weeknight meal:


You will need a large oven-safe pan with a lid for this

  • 1 tsp paprika
  • 1 tsp onion powder
  • 1 tsp garlic powder
  • 1/2 tsp dried parsley
  • 1/2 tsp dried oregano
  • 1/2 tsp dried basil
  • 1/2 tsp dried thyme
  • 1/2 tsp chili powder
  • 1/4 tsp pepper
  • 1/4 tsp salt
  • 4 bone-in, skin-on chicken thighs
  • 1 red bell pepper, sliced into strips
  • 1 yellow onion, halved & sliced
  • 6-8 small red potatoes, quartered (bite-sized pieces)
  • 2 Tbsp butter
  • 1 zucchini, halved lengthwise & sliced
  • 1/2 pint cherry tomatoes, halved
  • 1 lemon, zest & juice
  1. Mix the paprika, onion powder, garlic powder, parsley, oregano, basil, thyme, chili powder, salt & pepper together. Split the spice mix in half.
  2. Rub the chicken thighs all over with half of the spice mix & let it sit for at least an hour to overnight. If you do refrigerate the chicken, remember to take it out a few minutes early and let it come up to room temp before cooking.
  3. Preheat the oven to 300 degrees.
  4. On the stove top, put a Tbsp of vegetable oil in a large, deep pan over medium-high. Place the chicken thighs skin side down & cook for 3-4 minutes until it begins to brown. Flip the thighs & cook another 3-4 minutes. Remove from the pan & set aside. (Alternatively, you can also grill the chicken.)
  5. Reduce the heat to medium. Add the sliced onions & peppers to the pan & cook for 4-5 minutes until tender, stirring occasionally.
  6. Add the potatoes & butter. When the butter melts, stir in the remaining spice mixture. Reduce heat to a low simmer, cover the pan & cook for 15 minutes.
  7. Add the tomatoes, zucchini & lemon zest to the pan & stir it together. Place the chicken thighs skin side up in the pan on top of the veggies, being careful not to submerge them. (You want to keep the skin from getting soggy.) Drizzle the lemon juice over everything.
  8. Cover & cook in the oven at 300 degrees for 15 minutes. Remove the lid & cook an additional 5-10 minutes, until the potatoes are tender & the chicken is golden brown.

The key to this whole thing is keeping the chicken skin as crispy as possible. I personally like to use a grill or a grill pan to really get a good sear on it, but for the sake of the one pan meal, I tried it & it does work pretty well on a hot stovetop situation. Just make sure you let the pan cool a little bit before adding the veggies so you don’t char them.


Heavenly

Chicken thighs can be a little scary for some people, especially with the bone in them. I personally think a chicken thigh is much more attractive on the bone with the skin, but maybe that’s just me. They have more flavor & don’t overcook & dry out nearly as easily as the chicken breast.

This is not only an easy clean up recipe, it’s an economical one too. Chicken thighs are often on sale & always way cheaper. All the spices and dried herbs are pantry staples. Add some veggies and get to it!


It’s also approved by Mona & her sniffer

I really hope you guys try this one out. Let me know what you think! I’m also super excited to get this post up, go explore Seattle, & then come home to work on all the new recipes & projects I have in mind.

Make sure to follow along on instagram, @thepickygourmet! There should be a lot of fun stuff to see in the PNW this week. Peace out, internet!

Homemade Ice Cream with a Surprise Shortcut

It’s officially Spring, the colder areas of the country are thawing out and getting reacquainted with the sun, so why waste anytime? It’s never too early to kick off ice cream season. (Although in Hawaii, it’s always ice cream season.)

Honestly, I should be cleaning and packing. I’m headed back to the east coast next week to see my family and friends in Massachusetts, then spending a weekend in New York City for one of my bestest high school friends weddings. Get this- I’m a groomsman. Groomswoman? Groomslady? Whatever you call it, I get to wear a tuxedo and I’m obnoxiously excited for it. Pictures will surely be shared on my Instagram stories from my travels, so follow along @thepickygourmet if you don’t already!

Again, I should be preparing, but I’m writing this instead. Which is why I’ll keep this one fairly short and sweet (dessert pun!).

This ice cream is the creamiest, dreamiest, easiest homemade version possible. It blows store-bought cartons out of the water, and you don’t have to trek all the way to the fancy shop that is delicious but costs $6-$10 for a decent serving. You also don’t need some fancy ice cream maker, or any equipment besides a whisk and rubber spatula.

So what’s the secret?

Instant pudding mix. Mind blown.

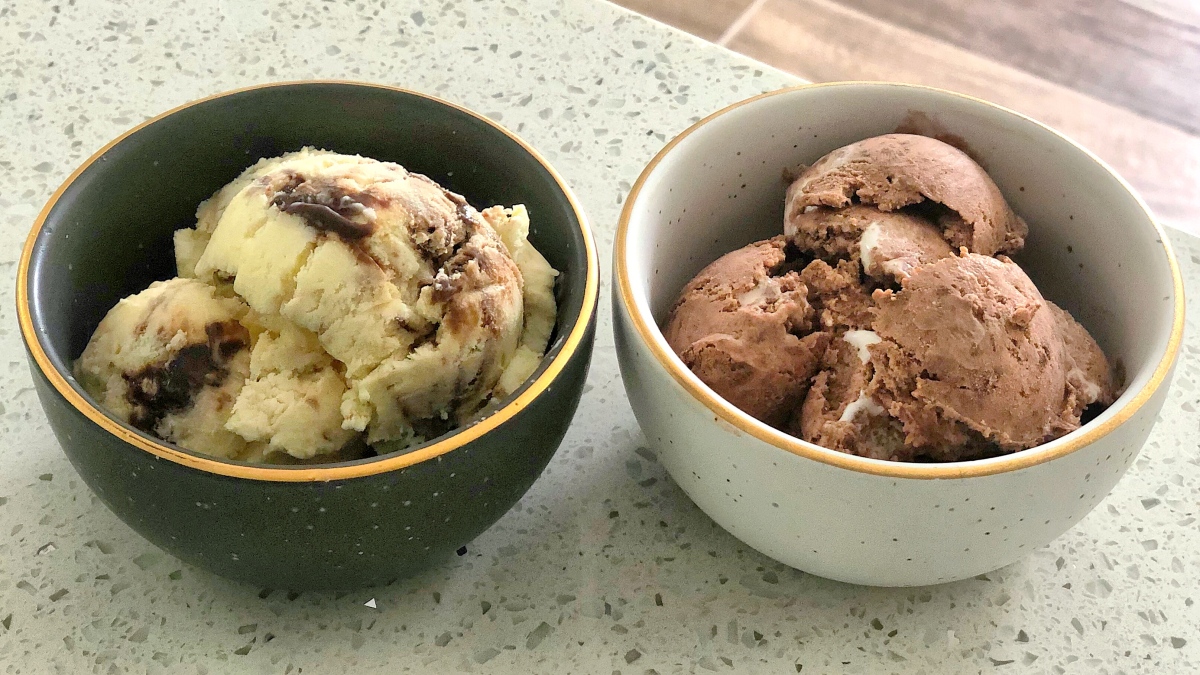
I made two versions:

Banana Fudge Swirl

  • 1 1/2 cup heavy cream
  • 1/2 tsp vanilla extract
  • 1/2 tsp coconut extract (if you don’t have this, double the vanilla)
  • 1 box Jell-o banana cream pudding mix
  • 1/2 cup milk
  • 14oz can sweetened condensed milk
  • 2-4 Tbsp chocolate fudge topping for drizzling
  1. Pour the heavy cream, vanilla & coconut extract into a chilled bowl. Whisk vigorously until soft peaks form (think Greek yogurt consistency). You can use a hand mixer if you’d like.
  2. Add the pudding mix & use a rubber spatula to fold it together. Once the dry pudding mix is fully absorbed, add the milk & the sweetened condensed milk. Continue folding until everything is well incorporated.
  3. Pour half of the mixture into a metal loaf pan, or any other freezer safe pan or bowl. Drizzle 1-2 Tbsps of chocolate fudge topping into the batter & use a skewer or butter knife to swirl it around. Repeat with the remaining ice cream batter & chocolate fudge topping.
  4. Cover with plastic & freeze for 4 hours before serving. Leftovers can be kept in the freezer for 2-3 weeks.

Chocolate Marshmallow

  • 1 1/2 cup heavy cream
  • 1 tsp vanilla extract
  • 1 box Jell-o chocolate fudge pudding mix
  • 1/2 cup milk
  • 14oz can sweetened condensed milk
  • marshmallow spread
  1. Pour the heavy cream & vanilla into a chilled bowl. Whisk vigorously until soft peaks form (think Greek yogurt consistency). You can use a hand mixer if you’d like.
  2. Add the pudding mix & use a rubber spatula to fold it together. Once the dry pudding mix is fully absorbed, add the milk & the sweetened condensed milk. Continue folding until everything is well incorporated.
  3. Pour half of the mixture into a metal loaf pan, or any other freezer safe pan or bowl. Use a small spoon to drop dollops of marshmallow spread into the batter & use a skewer or butter knife to swirl it around. Repeat with the remaining ice cream batter & more marshmallow spread, to your liking.
  4. Cover with plastic & freeze for 4 hours before serving. Leftovers can be kept in the freezer for 2-3 weeks.

A little effort goes a long way, because the texture of this ice cream is borderline that of a frozen custard without the use of eggs. It’s thick & creamy, and even after days in the freezer, it doesn’t develop that crumbly, dried out texture that some store-bought brands get.


Optional toppings, but why wouldn’t you?

It’s very easy to do, all in one bowl, so clean up is minimal. This would be a great recipe to try with kids when it’s hot out and you don’t want to turn the oven on to bake. Also, there’s so many ways to experiment with different flavors and toppings! Maybe get some vanilla pudding mix with some maple extract and candied pecans. Or lemon with a strawberry syrup swirl. How about white chocolate pudding with caramel sauce? You can have a contest to see who makes the best combo! (And not just with kids, I would totally throw this party for my adult friends and me.)

I’m telling you, this is one of my favorite recipes ever. I don’t think I’m ever going to bother with cartons again when I can pretend to have my very own ice cream shop in my own kitchen. Let me know what you think, and I’ll see you again after I’m back from my trip with another recipe!

Indian Chicken Lasagna

I have been a little MIA from the blog. My family came out for a week long visit, we had a couple different military balls to attend, and overall it’s been a busy time. The good news is that I have been cooking, and I have like three new recipes waiting to be shared. It was just a matter of having the time and energy to write them out. But I’m back in the swing of things!

So there’s no escaping the reaction the title of this recipe will get. Indian food mixed with Italian food? Uh… what?! The whole time I was making this dish, I kept asking myself if it was crazy. And it was crazy… crazy delicious.


It looks delicious, right?

I love Indian food. Tikka masala and vindaloo and pakora and curry and the rice and the naan… YUM. Unfortunately I have not found a good place here in Hawaii yet (hit me up if you have any leads) so when I am craving those bold, spicy Indian flavors, I have to make it myself.

The base of this recipe comes from having a lot of leftovers from my slow cooker coconut curry chicken. So yeah, the lasagna kind of requires making a recipe before the recipe, but you can always use the chicken (or beef, or lamb, or whatever) tikka masala from your weekend take-out leftovers. Another shortcut option would be to get a really good jarred curry or tikka masala sauce and throw it in the crock-pot with some chicken for a few hours.

**The only thing you have to keep consistent is that before going in the lasagna, the chicken (or whatever protein you choose) needs to be shredded and easy to spread**

  • 2 cups coconut curry chicken (or any leftover Indian chicken in sauce)
  • 12-16 lasagna noodle sheets (avoid the “no boil” noodles, use traditional)
  • 1 1/2 cups ricotta cheese
  • 2 tsp garlic powder
  • 1 tsp dried thyme
  • 1 tsp dried oregano
  • 3 tsp extra virgin olive oil
  • 1 1/2 cups shredded mozzarella
  • 1/4 cup shredded parmesan
  • fresh parsley for garnish
  1. Make sure the chicken in the sauce is properly shredded & will spread evenly. Boil the lasagna noodles according to package directions & let cool. (The “no boil” noodles need a lot of moisture to cook in the oven & can come out dry/uncooked, so use traditional lasagna sheets.)
  2. Preheat the oven to 375 degrees.
  3. In a bowl, stir together the ricotta, garlic powder, thyme, oregano, extra virgin olive oil with a pinch of salt & pepper.
  4. In a 9×13 baking dish, start by spreading 1/3 of the ricotta mixture thinly & evenly over the bottom. Top that with 3 of the lasagna noodles. (If yours come up short, use an extra to fill in the gap. Better to have too many than too little.)
  5. Continue the layers by adding, in this order: 1 cup of the coconut curry chicken, 1/2 cup of the mozzarella, noodles, the remaining ricotta mixture, noodles, the remaining coconut curry chicken, noodles & top it all off with the remaining mozzarella & the parmesan.
  6. Cover with foil & bake for 25 minutes. Remove the foil & finish for another 10-15 minutes until the cheese on top is golden brown. Top with fresh chopped parsley.

It looks like lasagna, it tastes like Indian cuisine. Maybe it’s wrong to call it lasagna? Maybe it’s more of a casserole? I’m not sure. This is a rare recipe that I threw together on a wild whim and ended up surprising myself. (Thank goodness I had the instinct to write down measurements as I went.)

Unlike most recipes I come up with, this isn’t one I urge people to get up and try right away. It’s more in the vein of an interesting use for your leftovers. Here’s the scenario I found myself in: It’s two days later, the curry chicken is sitting in the fridge and you just aren’t feeling it anymore. Oh hey, you have those lasagna noodles that have been hanging out in the pantry, why not? Boom, a whole new dish.

Again, the key here is some shredded, saucy chicken. If you need to stretch it a little more to hit 2 full cups, add a little tomato sauce. Really, that’s the only difference between this and normal lasagna… the meaty sauce. In theory, this could work with chicken in enchilada sauce, or sesame sauce, or buffalo sauce.


Ricotta mixture + {insert your chicken here}

The possibilities are endless, and it really gives new life to the leftovers and (added bonus) 1-2 servings of chicken becomes a meal for 4-6 people.

Part of me thinks maybe this recipe was a little too unrefined and improvised to share here, but when I tasted it, I couldn’t help myself. It was so fun and delicious and different that I had to put it out here. I don’t expect it to be my most popular dish, since it kind of requires the extra step in the beginning and I prefer making things easy-peasy-lemon-squeezy for you all… but hey. No harm in letting you decide for yourself if you are ready for Indian chicken lasagna.